1.What is the Red Sun & Yellow Sun Trending Photo Edit?
Recent perusal of Instagram and TikTok feeds has likely revealed an abundance of imagery enveloped in warm, luminous radiance, characterized by either a profound crimson sun dipping low on the horizon or a gentle ochre haze permeating the scene.
This phenomenon, dubbed the Red Sun & Yellow Sun photo edit trend.
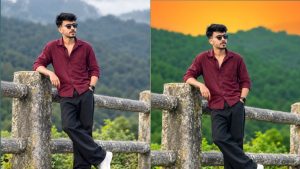
Is rapidly saturating social media platforms worldwide.This editing technique replicates the visual aesthetics of a sunset photograph, irrespective of whether the original capture occurred midday or within an indoor environment.Through the strategic layering of warm hues, precise exposure adjustments, and the introduction of a delicate luminosity.
The process transmutes a mundane snapshot into an image that evokes the golden hour or resembles a scene from a dreamy, retro-filmic narrative.The red sun variant embraces a profoundly somber and atmospheric aesthetic, characterized by skies saturated with deep crimson and burnt orange hues.

Here the sun manifests not as a traditional light source but as a striking, crimson orb that imbues the imagery with a dramatic, almost apocalyptic intensity.This style is particularly favored when capturing beachscapes, urban skylines, and silhouette photography.
Conversely, the yellow sun variant imparts a lighter, softer quality.
Bathing the composition in a golden-yellow radiance that evokes a nostalgic, sun-drenched atmosphere, proving exceptionally effective for portraiture, natural landscapes, and unscripted moments.The most advantageous aspect is that both edits can be executed directly on your iPhone utilizing the native Photos application alongside a series of strategic adjustments.
Thereby eliminating the necessity for sophisticated editing suites or external third-party applications.In the ensuing sections, we will guide you through the precise replication of both aesthetic styles, detailing each step of the process.
2.Why the trend is so Popular:
The viral success of this edit stems from its unique ability to transmute mundane imagery such as sunsets, selfies, or landscapes into scenes that appear extracted from a dreamlike, retro film reel.By employing warm, saturated hues, the technique imbues photographs with a nostalgic, cinematic allure.
Creating a visual experience that is simultaneously familiar and profoundly otherworldly.A significant component of its allure lies in the remarkable ease with which the effect can be realized, requiring neither costly editing suites, professional-grade cameras, nor sophisticated photographic expertise.
By leveraging native applications on the iPhone, the entire process unfolds directly within the device, thereby democratizing participation for users regardless of their technical proficiency.It is precisely this negligible barrier to entry that propels such phenomena into viral status; when the capacity to engage becomes universal.
Participation inevitably follows.
This trend further leverages the potency of visual identity within social media ecosystems, where sharing an image adorned with the signature red or yellow sun filter serves as an immediate marker of cultural currency.Such a choice imbues a user’s feed with a unified.
Aesthetically curated quality that commands attention amidst an ocean of conventional snapshots.By applying this striking color grading to mundane moments, ordinary experiences are transmuted into artistic expressions, a transformation that explains the widespread adoption of this filter across diverse settings.
Ranging from leisurely beach excursions to casual coffee shop rendezvous.
Ultimately, an emotional dimension plays a pivotal role.The interplay of warm reds and golden yellows conjures sensations of intimacy, solace, and nostalgia, effectively extending the ephemeral magic of the golden hour into a perpetual visual experience.
In an era characterized by the relentless velocity of digital feeds and the rapid obsolescence of content, such edits compel viewers to pause, engage through likes, and disseminate these images.It is precisely this potent synthesis of understated elegance, refined style, and resonant sentiment that ensures the trend’s enduring luminosity across all platforms.
3.How to make the Red Sun edit using the iPhone Photo App:
This is the stage where you engage directly with the image.Launch the Photos application and choose the photograph you intend to modify.By tapping the “Edit” button located in the upper-right corner of the display, you will summon the suite of editing instruments.
To commence, calibrate the exposure and luminance parameters by accessing the adjustment interface via the dial icon situated at the bottom of the screen.Subsequently, depress the Exposure slider to approximately -1.0 and the Brightness slider to roughly -0.5.This reduction in light values deepens the overall tonal range, thereby establishing the atmospheric.
Moody aesthetic characteristic of this trend.Subsequently, adjust the Contrast setting upward to approximately +25, thereby accentuating the sun’s brilliance against the dimmed celestial backdrop Following this, reduce the Highlights slider to roughly -50; this modification intensifies.
The luminosity of the solar disc while imbuing it with a profound, highly saturated hue of red or orange.To fully realize the desired coloration, elevate the Saturation by approximately +20 and enhance the Vibrance to roughly +15 Should the solar disc fail to achieve the requisite crimson intensity, access the color adjustment parameters and adjust.
The Warmth slider toward warmer tones, thereby cultivating an atmosphere reminiscent of a fiery, apocalyptic sunset.Conclude the composition by applying a dramatic vignette effect with an intensity of approximately +30; this will cause the periphery to dissolve into shadow, thereby focusing all visual attention upon the radiant sun.
Upon achieving a satisfactory result, select Done to preserve your modifications.
Should the initial color balance appear imperfect, remain undeterred; make incremental adjustments to the sliders, as each image possesses a unique lighting profile.With precise calibration, your Red Sun edit will attain a cinematic quality.
4.How to Make the Yellow Sun edit Using the iPhone photo App:
Having mastered the technique for crafting the Red Sun edit, you may now proceed to the Yellow Sun variant.This configuration is notably more streamlined, necessitating fewer adjustments, which renders it an ideal choice for those operating under time constraints or who are just commencing their journey with mobile photo editing on the iPhone.
Commence by launching the Photos application and designating the sunset photograph for modification.Initiate the editing suite by tapping the Edit command located in the upper-right corner.To achieve the Yellow Sun effect, begin with the prerequisite step previously established.
Prompt:
Bright cinematic outdoor color grading. Chany Find similaro a full solid vibrant orange gradient covering the entire sky, smooth clean gradient, no sunset glow and no visible sun. Keep the lighting bright naturalgreen color as in the reference images, rich fresh rice-field green tone, high saturation but still realistic, deep lush green similar to healthy paddy field plants. Add strong background blur (depth of field) to the distant background while keeping the subject extreme
Generate Image
Decrease the Brilliance slider to approximately -25.This adjustment serves to subtly flatten the image’s tonal range, thereby conditioning it for the subsequent warm color modifications.Proceed by adjusting the Vibrance slider downward to approximately -15, which softens the overall coloration and imparts a subdued, ethereal character to the sky.
Subsequently, increase the Warmth slider to roughly +30; this pivotal adjustment is essential for the Yellow Sun edit, as the enhanced warmth accentuates golden and amber hues across the composition, rendering the sun with a profound, luminous glow.
Subsequently, fine-tune the Tint slider incrementally toward +10 to amplify the golden hues with greater intensity.
If the objective is to render the sun appearing more brilliant and radiant against the celestial backdrop, a modest increase in Exposure, approximately +5, is advisable.Distinct from the Red Sun edit, which depends on pronounced saturation.
The Yellow Sun effect yields optimal results through nuanced adjustments that allow the inherent warmth of the sunset to emerge organically.Upon satisfaction with the modifications, select Done to commit your edits.The final output should manifest as an image imbued with a soft, golden luminescence.
Featuring the sun rendered as a warm, yellow sphere suspended within a hazy, sun-drenched expanse.Should the effect prove either overly intense or insufficiently pronounced, hesitate not to revert and recalibrate the sliders; the art of editing is fundamentally an exercise in experimentation.
A crucial consideration when applying the Yellow Sun edit is its optimal performance with photographs captured during the golden hour, immediately preceding sunset, when ambient illumination possesses an inherent warmth and softness.Conversely, images acquired under the severity of midday sunlight may yield less seamless results.therefore, it is imperative to select your source image with deliberate care.
5.Best photo lighting to use For the Edit:
Achieving the desired aesthetic in red and yellow sun edits hinges critically on lighting, as the final outcome can be entirely determined by its quality.Given that these compositions depend profoundly on warm, dramatic tonality, the source photograph must inherently possess the appropriate luminous characteristics to serve as a viable foundation.
Leveraging the golden hour is essential for this technique; capturing images shortly after sunrise or immediately before sunset imparts a soft, warm luminescence that harmonizes seamlessly with the scene’s inherent red and yellow solar tones.Furthermore, the sun’s low trajectory during these periods generates elongated shadows and profound contrast.
Thereby infusing your edit with significant depth and ensuring the artificial sun appears authentically integrated into the environment.In the absence of the golden hour, seek out backlighting conditions where the light source illuminates your subject from behind.
This technique generates silhouettes and evokes hazy, dreamlike atmospheres that harmonize seamlessly with current trending sun edits.Among the most arresting visual outcomes of this trend is the creation of a silhouette set against the radiant backdrop of a sun burning in hues of crimson or gold.
Whenever feasible, eschew the unforgiving intensity of midday illumination; the flat, blinding radiance of the zenith sun tends to desaturate hues, thereby diminishing the potential for edited warmth to emerge with any vibrancy.Should circumstances necessitate reliance upon such imagery, one might instead capture scenes under.
A softly diffused, overcast sky or within the gentle refuge of shadow, subsequently reintroducing warmth through the meticulous application of post-processingtechniques Indoor photography remains a viable option provided that one exercises precise control over lighting sources.
By employing warm-hued lamps or capturing window light entering at a low angle, it is possible to emulate the aesthetic qualities of the golden hour.However, it is imperative that the directional quality of the illumination captured in the photograph corresponds accurately with the placement of the sun during post-production editing.
Any discrepancy between the two will result in a final image that appears inherently unnatural.Ultimately, prioritize capturing images at the highest possible quality.While adequate lighting establishes the atmosphere of an edit, a sharp, high-resolution foundation is what imparts the essential polish that compels viewers to pause their scrolling.